
In this article, we’ll show you how to manually upgrade Windows 10 to Windows 11 25H2 (in-place upgrade) on a computer that doesn’t meet the minimum requirements, without a clean reinstallation of the operating system and without losing data and installed programs.
Preparing to upgrade from Windows 10 to Windows 11
To update, you will need the official Windows 11 25H2 ISO image, which can be downloaded from the Microsoft website or generated using the Media Creation Tool ( https://www.microsoft.com/software-download/windows11 ).
Make sure your computer is running the latest available build of Windows 10 22H2:
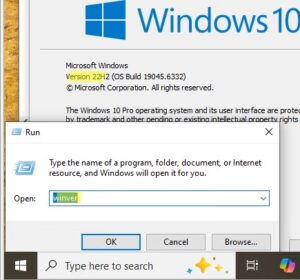
- Click
Win+R - Run the command:
winver - The command will display information about the installed version of Windows.
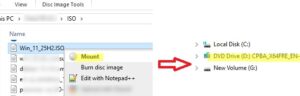
Mount the Windows 11 25H2 installation ISO image. A virtual DVD drive will appear in the system, assigned the letter D: (by default).
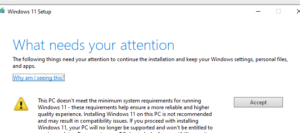
Typically, to manually upgrade Windows 10 22H2 to Windows 11 on an older computer, you need to run setup.exe from the mounted ISO image with build 25H2. If your computer’s hardware doesn’t meet the minimum requirements, the following message will appear during the upgrade:
This computer does not meet the minimum system requirements for installing Windows 11:
- The processor is not supported for this version of Windows.
- The computer must support Trusted Platform Module 2.0.
To quickly check your computer’s hardware for compatibility with Windows 11 25H2, open a command prompt and navigate to the virtual DVD drive:
cd d:\
Run the command:
./setup.exe /auto upgrade /noreboot /DynamicUpdate disable /Compat ScanOnly
In this mode, Windows Installer will perform a compatibility check without performing the upgrade.

Bypassing the Windows 11 computer compatibility check
To prevent the Windows 11 setup program from checking your computer’s system requirements before upgrading, you need to make changes to the registry.
In the official documentation, Microsoft suggests creating the AllowUpgradesWithUnsupportedTPMOrCPU registry key , which allows the computer to ignore the lack of a TPM 2.0 chip and unsupported processors during upgrades ( link ). You can create this registry key in Windows 10 using the command:
reg add HKLM\SYSTEM\Setup\MoSetup /f /v AllowUpgradesWithUnsupportedTPMorCPU /d 1 /t reg_dword
In this case, the CPU generation and TPM 2.0 chip will not be checked, but the TPM 1.2 chip is still required. If it is missing, you will not be able to complete the update. You can check for the presence of a TPM chip on your computer using the PowerShell command:
Get-TPM
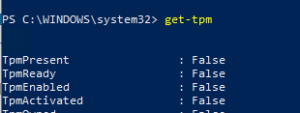
If the TPM chip is missing ( TpmPresent=False ), there are workarounds to upgrade to Windows 11 without checking compatibility.
reg delete "HKLM\SOFTWARE\Microsoft\Windows NT\CurrentVersion\AppCompatFlags\CompatMarkers" /f

reg delete "HKLM\SOFTWARE\Microsoft\Windows NT\CurrentVersion\AppCompatFlags\Shared" /f

reg delete "HKLM\SOFTWARE\Microsoft\Windows NT\CurrentVersion\AppCompatFlags\TargetVersionUpgradeExperienceIndicators" /f

reg add "HKLM\SOFTWARE\Microsoft\Windows NT\CurrentVersion\AppCompatFlags\HwReqChk" /v "HwReqChkVars" /t REG_MULTI_SZ /s "," /d "SQ_SecureBootCapable=TRUE,SQ_SecureBootEnabled=TRUE,SQ_TpmVersion=2,SQ_RamMB=8192" /f

reg add "HKLM\SYSTEM\Setup\MoSetup" /v "AllowUpgradesWithUnsupportedTPMOrCPU" /t REG_DWORD /d 1 /f

- The first three commands remove registry entries about previous update attempts and hardware requirements failures.
- Then the registry parameter HwReqChk is added , which simulates that the computer has passed the minimum requirements compatibility check (TPM, CPU, RAM)
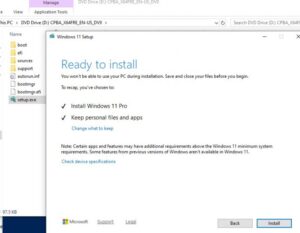
After implementing these changes, run setup.exe from the Windows 11 installation image. You will now be able to perform an in-place upgrade of Windows 10 bypassing hardware checks and preserving installed programs and user files (select the Keep personal files and apps option ).
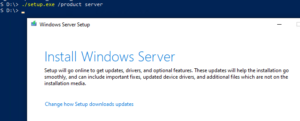
Upgrading to Windows 11 using the /product server option
Another way to upgrade to Windows 11 is to tell setup.exe that you are installing an edition of Windows Server that does not include CPU and TPM chip verification.
Open a command prompt and run the Windows 11 update wizard in special mode:
./setup.exe /product server
Or
D:\sourcs\setupprep.exe /product server
When upgrading, also specify that you want to keep installed files, settings, and programs.

Even though you specified the settings for installing Windows Server, the actual edition of Windows that was installed on the computer is the same as the one you had previously.
After the upgrade is complete, check the Windows version and build using the command:
Get-ItemProperty -Path "HKLM:\SOFTWARE\Microsoft\Windows NT\CurrentVersion"| select ProductName, DisplayVersion, CurrentBuild
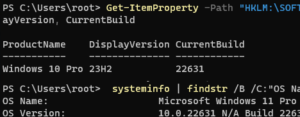
As you can see, the upgrade to the regular Pro edition of Windows 11 has been completed.
Another previously working method for upgrading to Windows 11 on unsupported hardware involves modifying the appraiserres.dll file on the installation media.
- Copy the Windows 11 installation image files to a local drive (or burn the ISO image to a USB flash drive);
- Clear the contents of the appraiserres.dll file in the sources folder:
Clear-Content C:\Win11_ISO\sources\appraiserres.dll -Force - After that, run the file
setup.exeand continue upgrading to Windows 11.
To silently upgrade your computer to Windows 11 automatically, you can use the setup.exe command line options :
start /wait d:\setup.exe /Auto Upgrade /Quiet /DynamicUpdate disable /showoobe None /Telemetry Disable /compat IgnoreWarning /NoReboot
Before upgrading, ensure that the edition upgrade restriction is disabled in Windows settings. It’s also a good idea to disable the new update protection setting, which blocks the delivery of new versions of Windows on computers that have compatibility issues with the new build:
reg add HKLM\SOFTWARE\Policies\Microsoft\Windows\WindowsUpdate /f /v DisableWUfBSafeguards /d 1 /t reg_dword
It corresponds to the GPO setting Disable safeguards for Feature Updates under Computer Configuration -> Administrative Templates -> Windows Components -> Windows Update -> Manage updates offered from Windows Updates.
October 2025 update . You can also use the third-party utility Flyby11 to update a computer that doesn’t meet the system requirements to Windows 11. However, I prefer not to use third-party tools on my systems, especially since there are perfectly valid ways to bypass system requirement checks.