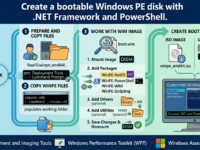
Create a bootable Windows PE disk with .NET Framework and PowerShell
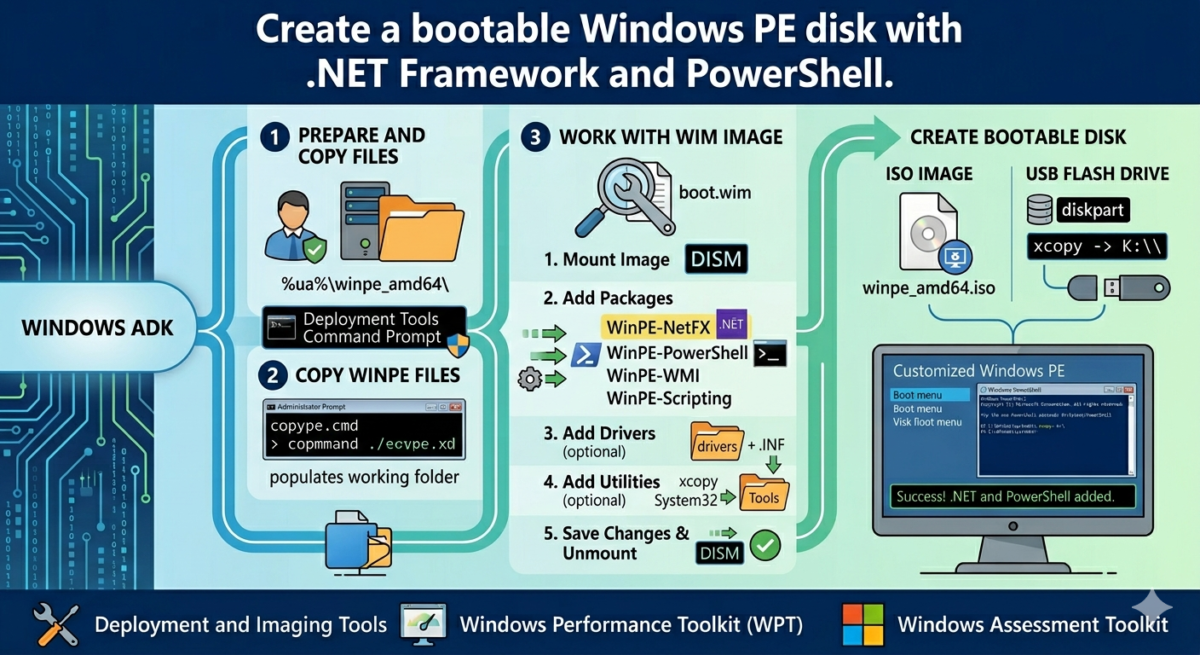
Table of Contents
Windows PE is included in the Windows ADK, which now combines deployment and assessment tools for various system settings.
What’s included in the Windows ADK?
Previously, tools for preparing the operating system for deployment and assessing its performance were provided as separate packages. Now, the Windows Assessment and Development Kit (ADK) combines several packages.
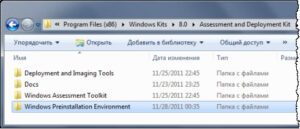
Deployment and Imaging Tools and Windows Preinstallation Environment
These tools for preparing Windows for deployment were previously part of the WAIK, and Windows System Image Manager has not even changed in appearance.
Windows Performance Toolkit
The Windows Performance Toolkit, which you’re already familiar with from other blog posts, was previously included in the SDK. WPT now includes new tools for recording various application and system performance scenarios (Windows Performance Recorder) and viewing recordings (Windows Performance Analyzer).
Windows Assessment Toolkit
This new suite, anchored by the Windows Assessment Console, enables you to evaluate various Windows and application performance parameters, including performance and energy consumption.
The console is convenient because it already includes various tests, and they are combined into groups for a comprehensive assessment.
Downloading and installing the Windows ADK
You can freely download the latest version of the Windows ADK. Download the Windows PE add-on for the ADK from the same page.
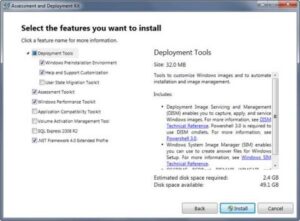
Microsoft doesn’t offer an ISO download, but you can use the installer to download the complete kit ( instructions ) and create an image from it if necessary. After installation, you’ll find all kits in the Program Files\Windows Kits folder. However, if you have a 64-bit system, only some of the deployment tools will be there, with the rest being in Program Files (x86).
Windows PE version history
A full list of changes across versions is available in the documentation. The current version is Windows PE for Windows 10. It hasn’t undergone significant changes compared to its predecessor, but the environment was previously more actively developed.
For example, Windows PE 4.0 was the basis for the Windows 8 Preinstallation Environment, which brought a number of significant changes compared to Windows PE 3.1 from the Windows 7 era. At that time, the list of packages (link to the current document) that could be embedded in PE was expanded. Specifically, PE 4.0 added:
- .NET (WinPE-NetFX) enables running applications that require the .NET Framework.
- PowerShell (WinPE-PowerShell) allows you to use PowerShell in a PE environment. The ADK includes a new version of PowerShell.
- DISM PowerShell Cmdlets (WinPE-DismCmdlets) are new PowerShell 3 cmdlets for creating and servicing WIM images.
- Remote Network Driver Specification (WinPE-RNDIS) is useful for accessing remote clients from Windows PE.
- Windows PE Secure Startup (WinPE-SecureStartup) is required to manage BitLocker and TPM.
The changes in Windows PE 5.0 and 5.1 weren’t as significant. However, while 5.0 was included in the ADK, 5.1, with WimBoot support (now obsolete), had to be applied as an update.
Below, I’ll explain how to create a bootable Windows PE disk with .NET Framework and PowerShell support. These instructions were written for Windows PE 4.0, but are also applicable to newer versions.
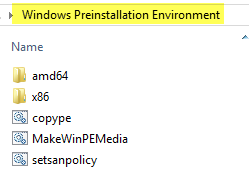
Preparing the working folder
Search for the deployment environment and run the deployment tools command prompt as administrator. This is essentially the DandISetEnv.bat file in the Deployment and Imaging Tools folder, which sets the necessary environment variables for quick access to the command-line tools.
For working with automatic installation and Windows PE, I’ve long ago created the %ua% environment variable, which points to the unattend folder in the profile root. You can create the same variable permanently or just for the current command prompt session, as shown below.
• In the command line
• In PowerShell
All subsequent commands will use the %ua% variable, regardless of where you created your working folder.
Copying Windows PE files to the working folder
The ADK includes a handy file, copype.cmd, that does this job in one command.
In the command line, run:
1 2 | cd "..\Windows Preinstallation Environment"copype.cmd amd64 %ua%\winpe_amd64\ |
The first command goes to the folder with the Windows PE file sets, and the second one runs the copype.cmd file with the parameters amd64 to create a 64-bit PE and %ua%\winpe_amd64\ to copy the necessary files to this folder, which we will work with further.
Working with a Windows PE WIM image
All actions must be performed in the deployment tools command line, which you launched with full rights in the previous step.
Step 1 – Mount the image
Mounting a WIM image is done with a single command using the DISM utility. If you frequently work with WIM images, it’s a good idea to clear any previous mounts first.
1 2 | dism /Cleanup-Wimdism /Mount-Wim /WimFile:%ua%\winpe_amd64\media\sources\boot.wim /index:1 /MountDir:%ua%\winpe_amd64\mount |
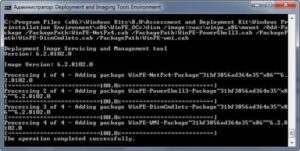
Step 2 – Adding packages to the image
The packages are located in the WinPE_OCs folder, and we will add:
- WMI
- .Net Framework
- Scripting (WSH)
- PowerShell
- DISM cmdlets
The first command changes to a folder, and the second adds packages:
1 2 3 4 5 6 7 8 9 10 11 12 | Dism /Add-Package /Image:"%ua%\winpe_amd64\mount" /PackagePath:"C:\Program Files (x86)\Windows Kits\10\Assessment and Deployment Kit\Windows Preinstallation Environment\amd64\WinPE_OCs\WinPE-WMI.cab"Dism /Add-Package /Image:"%ua%\winpe_amd64\mount" /PackagePath:"C:\Program Files (x86)\Windows Kits\10\Assessment and Deployment Kit\Windows Preinstallation Environment\amd64\WinPE_OCs\en-us\WinPE-WMI_en-us.cab"Dism /Add-Package /Image:"%ua%\winpe_amd64\mount" /PackagePath:"C:\Program Files (x86)\Windows Kits\10\Assessment and Deployment Kit\Windows Preinstallation Environment\amd64\WinPE_OCs\WinPE-NetFX.cab"Dism /Add-Package /Image:"%ua%\winpe_amd64\mount" /PackagePath:"C:\Program Files (x86)\Windows Kits\10\Assessment and Deployment Kit\Windows Preinstallation Environment\amd64\WinPE_OCs\en-us\WinPE-NetFX_en-us.cab"Dism /Add-Package /Image:"%ua%\winpe_amd64\mount" /PackagePath:"C:\Program Files (x86)\Windows Kits\10\Assessment and Deployment Kit\Windows Preinstallation Environment\amd64\WinPE_OCs\WinPE-Scripting.cab"Dism /Add-Package /Image:"%ua%\winpe_amd64\mount" /PackagePath:"C:\Program Files (x86)\Windows Kits\10\Assessment and Deployment Kit\Windows Preinstallation Environment\amd64\WinPE_OCs\en-us\WinPE-Scripting_en-us.cab"Dism /Add-Package /Image:"%ua%\winpe_amd64\mount" /PackagePath:"C:\Program Files (x86)\Windows Kits\10\Assessment and Deployment Kit\Windows Preinstallation Environment\amd64\WinPE_OCs\WinPE-PowerShell.cab"Dism /Add-Package /Image:"%ua%\winpe_amd64\mount" /PackagePath:"C:\Program Files (x86)\Windows Kits\10\Assessment and Deployment Kit\Windows Preinstallation Environment\amd64\WinPE_OCs\en-us\WinPE-PowerShell_en-us.cab"Dism /Add-Package /Image:"%ua%\winpe_amd64\mount" /PackagePath:"C:\Program Files (x86)\Windows Kits\10\Assessment and Deployment Kit\Windows Preinstallation Environment\amd64\WinPE_OCs\WinPE-StorageWMI.cab"Dism /Add-Package /Image:"%ua%\winpe_amd64\mount" /PackagePath:"C:\Program Files (x86)\Windows Kits\10\Assessment and Deployment Kit\Windows Preinstallation Environment\amd64\WinPE_OCs\en-us\WinPE-StorageWMI_en-us.cab"Dism /Add-Package /Image:"%ua%\winpe_amd64\mount" /PackagePath:"C:\Program Files (x86)\Windows Kits\10\Assessment and Deployment Kit\Windows Preinstallation Environment\amd64\WinPE_OCs\WinPE-DismCmdlets.cab"Dism /Add-Package /Image:"%ua%\winpe_amd64\mount" /PackagePath:"C:\Program Files (x86)\Windows Kits\10\Assessment and Deployment Kit\Windows Preinstallation Environment\amd64\WinPE_OCs\en-us\WinPE-DismCmdlets_en-us.cab" |
You can add any other packages from the WinPE_OCs folder. However, keep in mind that each package increases the size of the Windows PE image.
Important! The order of the commands is important. PowerShell requires the .NET Framework, so you need to add the WinPE-NetFX.cab package first, followed by WinPE-PowerShell.cab.
You can check the presence of packages in the image using the command:
1 | dism /image:%ua%\winpe_amd64\mount /Get-Packages |
Step 3 – Adding Drivers
This step is optional, as Windows PE contains a basic set of drivers, including those for network cards. You might need network access, for example, to save the captured WIM image to a network drive.
If necessary, you can use DISM to add:
- a separate driver by specifying the path to the INF file
- all drivers from the folder, specifying the path to it and the /recurse key
Examples of these commands:
1 2 | dism /Image:%ua%\winpe_amd64\mount /Add-Driver /Driver:C:\drivers\mydriver.INFdism /Image:%ua%\winpe_amd64\mount /Add-Driver /Driver:C:\drivers /recurse |
Step 4 – Adding your own utilities and scripts
I have a Tools folder where I store various utilities and command-line tools. I always include it in Windows PE by adding it to the root of the drive.
1 | xcopy /e /y "%userprofile%\PortableSoft\Tools" %ua%\winpe_amd64\media\Tools\ |
Alternatively, you can copy the utilities directly to the System32 folder of the image. This way, you can run them without having to navigate to the Tools folder or specify the full path. However, I prefer to keep things simple.
Using Windows PE 3.1 as an example, I’ve already discussed how to launch custom programs and scripts when PE starts. In this regard, the new version of Windows PE doesn’t seem to offer anything new.
Step 5 – Save changes and unmount the image
Both operations are performed within a single command.
1 | dism /Unmount-Wim /MountDir:%ua%\winpe_amd64\mount\ /Commit |
If something goes wrong and you don’t want to save the changes, use the /Discard switch.
The media folder now contains a pre-built Windows PE distribution. You can use it to create a bootable ISO image for burning to a disc or USB drive.
Create an ISO image or flash drive with Windows PE.
For experiments on a virtual machine, a bootable ISO image is more convenient:
1
oscdimg -n -b%ua%\winpe_amd64\fwfiles\etfsboot.com %ua%\winpe_amd64\media %ua%\winpe_amd64\iso\winpe_amd64.isoNow you can attach the image to the virtual machine and test Windows PE.
A bootable USB flash drive with Windows PE is more versatile, as there are many devices without a DVD drive. I’ve already described the process of creating a USB flash drive in detail using Windows PE 3.1, so here I’ll just list the diskpart commands.
Commands for preparing a bootable flash drive
After running these commands, your flash drive will be assigned a drive letter (e.g., K ). All that’s left to do is copy the contents of the media folder to the flash drive.
1 | xcopy %ua%\winpe_amd64\media\*.* /s /e /f К:\ |
Now you can connect the flash drive and boot from it.
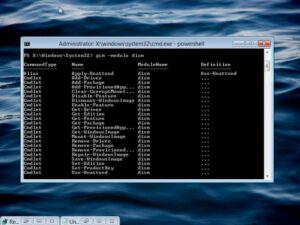
You can see that the .NET Framework has been successfully added because you can see a list of DISM cmdlets in PowerShell 3. I’ll show you how to use them to work with WIM images from Windows PE shortly.
To save time, you can read some interesting facts and useful tips about Windows PE, as well as experiment with launching applications and replacing the command-line interface with your preferred file manager.
Do you use Windows PE or other homemade disks? Tell us in the comments which disks you use for system maintenance and recovery!