How to Set Up an Android Smartphone: A Complete Guide
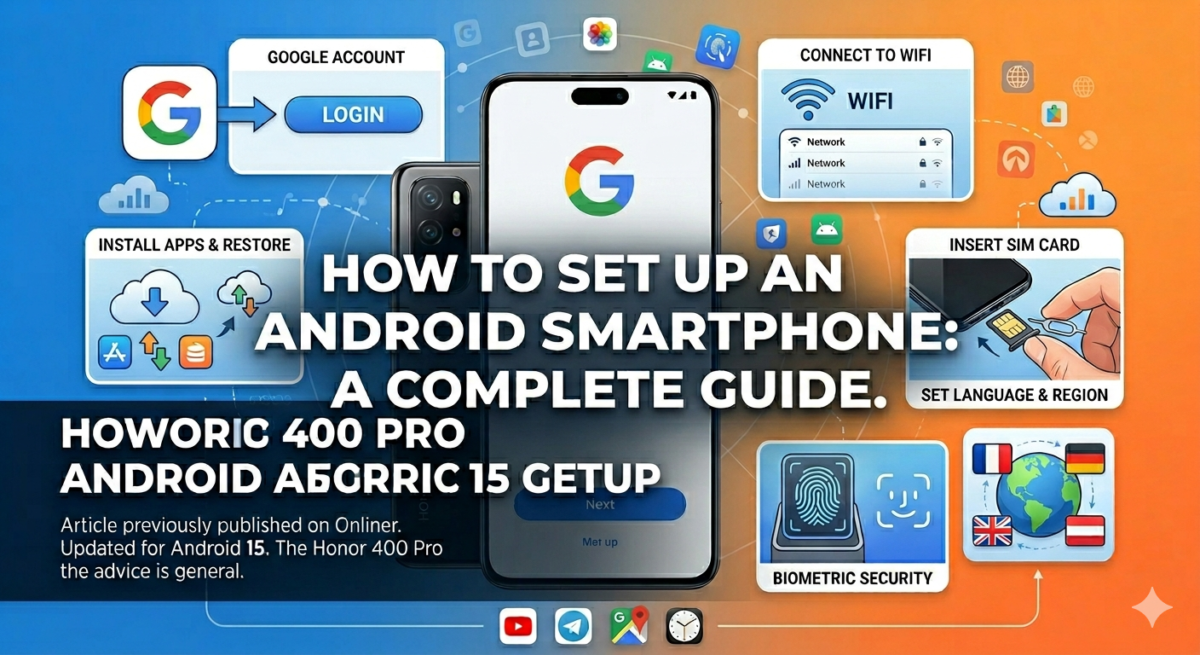
Table of Contents
- How to insert a SIM card correctly
- How to set up language, region, and Wi-Fi when you first turn on your Android smartphone
- How to sign in to or create a Google account on Android
- Do I need to sign in to an account for Samsung, Xiaomi, Huawei, and other brands?
- How to set up fingerprint, Face ID, and password on an Android smartphone
- Additional services and their configuration
- Additional Android features: backup, navigation, NFC, and power saving
Setting up a modern Android smartphone has become easier, but new users often have questions. When you first turn on your device, you may be asked to complete steps that seem confusing to the uninitiated, such as signing in to your Google account or installing apps. In this guide, we’ll show you how to quickly and easily set up your smartphone, even if you’re new to it.
It’s worth noting that Android is the platform upon which phone manufacturers build their own custom skins. While the operating system (OS) may vary by device, the core features and capabilities remain the same. There may also be nuances related to the Android version. We’re focusing on Android 15, one of the most current and widely used versions among recent smartphones. We used the Honor 400 Pro as our test model, but our advice applies to any device running Google’s OS.
This algorithm is relevant for those who are not transferring data from an old Android device, but are starting from scratch (the algorithm will be slightly different when restoring, but the initial settings are the same).
It’s best to set up your smartphone on a trusted Wi-Fi network (at home or work), rather than on public Wi-Fi in subways, shopping malls, and elsewhere—this is a security issue. An internet connection is required to receive system updates, install apps, and link your Google account. If your mobile plan allows it, you can do the same thing over a mobile network; it will use up a ton of data.
If it’s a new smartphone, it’s better to install the SIM card immediately, before setting it up.
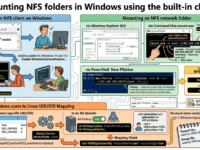
How to insert a SIM card correctly
To remove the SIM card tray, you’ll need a paperclip, which is included in every new smartphone box. Insert the thin end into the hole and gently but firmly press until the tray pops out. If you don’t have the included paperclip (either lost or used), a regular office tool will do (sharp needles are best avoided).
Important: Sometimes, the opening for one of the mobile device’s microphones is located near the tray. If you insert a paper clip into the microphone, you risk damaging it. Therefore, look carefully: the opening you need is on the sliding part, surrounded by a slot around the perimeter.
This step isn’t required to set up an Android smartphone, but the system will prompt you to install a SIM card during the process. This step can be skipped, as the module can be installed later. But why bother?
There may be one or two SIM cards; some smartphone models allow you to install a memory card instead of the second SIM card, which will be indicated in the device specifications.
How to set up language, region, and Wi-Fi when you first turn on your Android smartphone
After you’ve had your fill of the logo after the system boots up, proceed to the preliminary setup procedure.
First, your smartphone will prompt you to select your preferred language. Depending on the manufacturer, the default may be English or Russian. Select your preferred language from the list and proceed to the next step.
The order may vary: one smartphone will ask you to select a region, while another will ask you to install a SIM card if one isn’t already installed. Based on your regional settings, the system will later activate or deactivate certain software components. Select your country (in our case, Belarus) and click “Next.”
At one point, the system will require you to accept the User Agreement (Terms of Use). Agree, as otherwise you won’t be able to configure the device.
Next, your smartphone will prompt you to connect to Wi-Fi. Connect, otherwise you’ll have to go back to set it up again.
The device will then offer the option to copy data from the Google cloud: photos, contacts, and other information. If you already have a Google account, you can agree, but it will take a while for the data to load. If you’re a new user or want to set everything up yourself, skip this step by clicking “Next,” “Skip,” “Don’t Copy,” etc.
How to sign in to or create a Google account on Android
Android smartphones can be set up without a Gmail address, but this will create difficulties with storing, accessing, and transferring data in the future. Specifically, you won’t be able to instantly access Google services like email, images, YouTube, and so on (they’ll still ask you to sign in at least the first time you launch them).
Moreover, using a single account (Gmail), you can transfer data from one device to another. This includes apps, photos and videos, address books, calendars, alarms, and even desktop settings.
You can use an existing account or register a new one. You can also connect an account after setting up your Android smartphone for the first time.
To log in, you need to enter your email address and password. Two-factor authentication will require additional information: a code sent via SMS, email, or confirmation on another Android smartphone, if you have one.
The system will ask a series of questions. For example, when asked, “Who will use the device—you or your child?” answer “I” unless you’re setting up the smartphone exclusively for your child. The system will then prompt you to add a Google account. Accept the prompt; otherwise, you’ll be required to provide the account and enter your password when accessing Google services, as noted above.
The device will also check your service preferences. For example, location services are required for several apps and features (if you’re unsure how to manage this feature, leave it enabled). Searching for networks and devices is a less essential feature, but it does allow for more efficient location detection. However, it does impact battery consumption. The “Allow number verification” service provides an additional layer of security. To avoid unnecessary steps in the future, it’s best to leave these features enabled as well.
But the “Send device operation data” option can be switched to the “Disabled” state.
By checking the boxes, we confirm our choice.
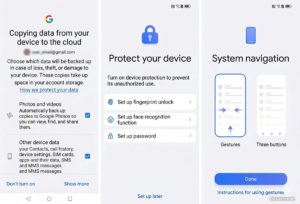
Next, your phone will ask you what exactly to copy to the cloud. It’s best to leave all options enabled: this will create a storage space independent of your smartphone for photos, videos, contacts, settings, call logs, and some other data. However, you’ll have to monitor the storage of at least Google Photos: the free storage is only 15 GB, which can quickly fill up with photos.
Do I need to sign in to an account for Samsung, Xiaomi, Huawei, and other brands?
Depending on the brand, your smartphone may persistently ask you to sign in to a “branded” account: this is the case with Honor, Huawei, Xiaomi (and related brands), Samsung, and some others. This is usually necessary to access additional features (health, AI, beauty features, access to other company devices, data storage (including secure storage), etc.).
We recommend creating a “branded” account if you don’t already have one and logging in. This will also make it easier to upgrade to a new smartphone model from the same brand in the future.
Please note that login to such an account may be offered both after and during the initial setup of the device.
In rare cases, Android will prompt you to set the time and date, but when connected to Wi-Fi or a mobile network, they will be set correctly immediately.
How to set up fingerprint, Face ID, and password on an Android smartphone
You can skip this step and set it up later, but it’s best to do it now. Your smartphone will prompt you to protect yourself (and you): with a fingerprint, face scanner, and password. The options may vary, but every modern smartphone likely has a fingerprint scanner and a password.
We recommend at least adding fingerprints, as this feature allows you to log in to your accounts and confirm purchases with a single swipe—by placing your finger on the scanner, rather than entering a password. Some high-end Android smartphones also support payments using the face scanner, but it’s typically used only for unlocking. A password, in this case, also serves as an unlocking function.
In all three cases, you’ll need to create a digital PIN as an additional layer of security. If you choose the face and/or fingerprint scanner, the password option will be removed as irrelevant.
Additional services and their configuration
We will only mention the main ones, since the set of functions varies on smartphones from different manufacturers.
“System Software Update Service”: Enable this because the current version of software is needed for both security and operation.
Wi-Fi+: improves connection quality, but should be disabled when roaming. Enable it when on a home network.
Weather Services: If you want to know about the weather, you need to turn it on.
Product Improvement Program: Doesn’t affect anything noticeable to the user. This feature can be left unchecked.
Additional Android features: backup, navigation, NFC, and power saving
Once the settings are complete, the smartphone will prompt you to check and update the system. Accept. Choose the system navigation method you prefer: gesture navigation (gesture navigation) means navigating with screen movements (gestures), while three buttons means the standard Android buttons are present at the bottom of the screen.
Backups. If you didn’t enable them initially, enable them in the system settings under “Backup and Restore.” This may not seem like a big deal, but it only works until your smartphone malfunctions or is lost. It’s also convenient if you upgrade to a new device: all your data can be transferred by selecting “Data Restore” when setting up your new device for the first time. Some smartphones allow you to create backups on external drives (for example, a PC).
After completing the initial setup of the device, the user can relax—the mobile phone will work, and all you need to do is install the necessary apps. These can include games, banking apps, navigation apps, maps (although these are usually included in the initial software package), instant messengers (Telegram, WhatsApp, Viber, etc.), social networks (VKontakte, Odnoklassniki, Facebook, and similar ones, if they are not preinstalled), and so on.
Experiment with screen brightness settings. By default, it’s automatically adjusted by the system, which reads the light sensor, reducing brightness in the dark and increasing it in bright light. The user adjusts this setting by moving the slider, and Android remembers the conditions under which the brightness should be higher or lower.
If your smartphone supports contactless payments and you know how to use them, you need to activate NFC.
The same applies to the Bluetooth option. It’s typically used to connect wireless headphones or external speakers, as well as to car audio systems.
Airplane Mode disables communication modules and cuts off the smartphone from the outside world. This helps extend battery life, but calls will not be received. Internet access is also disabled.
“Data Transfer” is, simply put, the internet itself. If this option is disabled, you won’t be able to access the internet through your mobile operator.
A pressing issue is battery life. Typically, an Android smartphone lasts about two days on a single full charge, but much depends on usage. We covered the basics a little earlier.
Android smartphones have settings that allow you to protect your battery from excessive strain. This option is typically hidden in the “Battery,” “Power Management,” or “Device Maintenance” menus. By default, the “automatic” (or “optimized,” or “balanced,” or other synonyms) mode is active. It gets the job done, but sometimes—when games are lagging—you need to turn on the “performance” mode. Or you might want to turn on the “ultra” (power-saving) mode when your battery is running low, and you’re miles from a power outlet.